


Leaderboard
-
Trevor
Administrators56Points1,470Posts -
NissanFan
Members4Points4Posts -
Supersub
Members4Points13Posts -
Mickmoonie
Members4Points12Posts


Popular Content
Showing content with the highest reputation since 08/30/2021 in Posts
-
Hmm, seems like someone had the issue before and a bodge was carried to rectify the issue (or at least attempt to rectify it). There is an issue with the timing chains and as far as I can see it was a recall from Nissan. It does suggest that it occurs on hard acceleration (e.g. from a slip-road) and if the chain is slack it can drift away from the timing point by a small fraction (much like a loose timing belt) which can then throw a code for cam/crank timing and result in what you are experiencing. I would personally replace the engine oil and look to see what has come out - e.g. metal particles and then replace it with the specified oil which may have not been supplied with previously. https://www.autodoc.co.uk/car-parts/engine-oil-12094/nissan/pulsar/pulsar-hatchback-c13/107484-1-2-dig-t If you use a quality oil of the correct specifications (as listed in the link above) and see if that makes any difference to how it runs. If no real difference is noted then I would advise to get the timing chain replaced which will almost certainly make a difference if it is worn2 points
-
2 pointsI use a smart screen with Android Auto. Then connect my phone via BlueTooth and use Waze map. Less expensive and live updates of accidents, traffic jams etc.2 points
-
I had the same problem radio cutting off there is a fee upgrade from nissan now work perfectly it's a common problem2 points
-
Hello, I am joining this forum with hopes to be able to supply you guys with some hard to come by parts for your beloved Nissans, as the title states we are the second oldest Nissan dealer in the uk and we are looking to move some of our older parts that have been stored away for years. I will be doing a follow up post with our parts list which should have thousands of items for you guys to sift through at your leisure, I just wanted to test the waters to see how helpful this would be for you guys, any responses or comments appreciated. Kind regards, Oscar2 points
-
2 pointsHi all! Im thinking of getting a Pathfinder in the next month or two. Wanted something bigger for going fishing/camping and always loved the look of the Pathfinder. Especially the older shape (07/08 models). Has anyone got a rot free one with upgraded timing chain they are thinking of parting with? Thanks in advance 🤘🏻🙂 Harry2 points
-
Great diagnosis and sometimes you can narrow it down to one part (hopefully a cheapish part) and then throw caution to the wind - it then either works or it doesn't.1 point
-
Thank you. I'll give that a try. So the rear N/S rear window gets 0.69v when operated from the drivers switch and the O/S rear window gets 3.67v when operated from the driver switch. I've pulled the driver switch apart and there's a 47uf 35v vt capacitor that was very loose and broke off. I've managed to solder it back on to close the windows. I'm going to order a ne Drivers windows switch and replace before i continue to trace the issue. Ground's seem good. I used some extra wire to bypass the ground on the plug and nothing changed. I know the rear switches work as when i hold down the Drivers switch and toggle the rear switch the window stops moving so i know the rear switch is inturupting the driver switch signal but the rear switch is just not sending the signal down to the motor. So i assume there's some back/forth with the main switch/BCM which is not getting completed. Fingers crossed it's the main drivers switch and not the BCM module. I may have to buy a laptop and grab a copy of Nissan Consult III. The service manual suggests there's a BCM test for windows which might be handy to identify the issue.1 point
-
Thats an odd one but I would start by peeling back the rubber gaiters running into the rear doors and check for any breaks in the wiring. After that, I would put a secondary earth to the earth connections on wiring and ensure that there is a decent earth to complete the circuit - let us know how you get on with it1 point
-
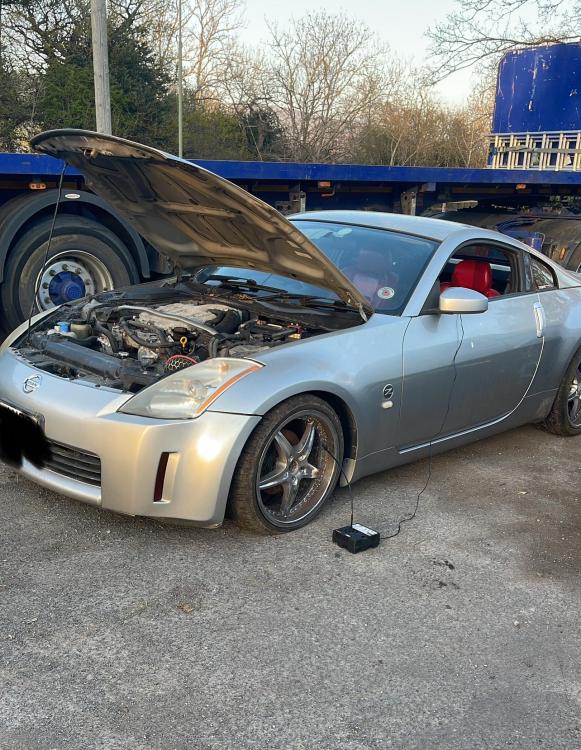
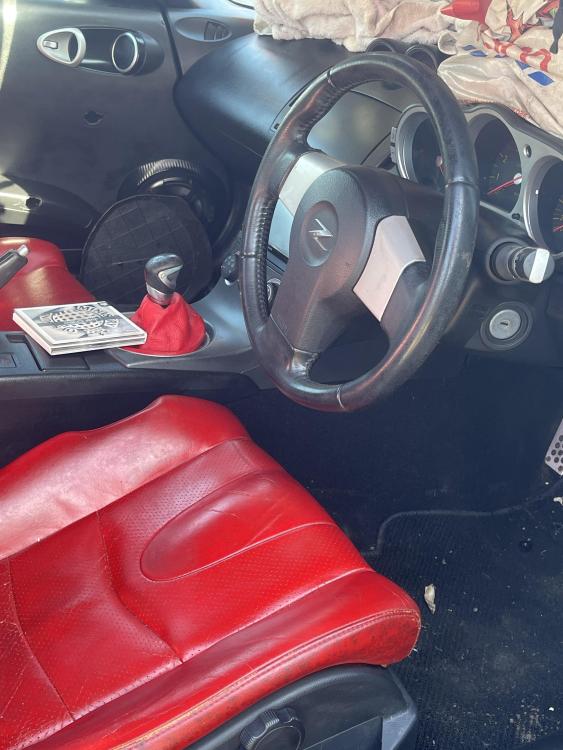
1 point1 point1 pointNew to pathfinders. After doing some light modifications for a bit of off road use and was wondering what stealth winches people are using. Would like to keep the original bumper. Any guides about. Tia1 point1 point1 pointHi all new to the group just wanted go introduce myself. I’m Adam and I’m in North Yorkshire I have a 02 Nissan 350z that I was recently given by my dad as it’s been sat for 2yrs. it had a little work done before it got parked up but it still needs a bit of love. tell me what you think.

 1 point1 pointHi there new to the forum and on the look for a nice well looked after 350z and wanting to see what if anything might be about. Many thanks in advance1 point1 pointI have always managed to find replacement resistor packs for most cars on eBay More than likely would be the same for most Nissan models - remove it and compare to images of them on eBay1 point1 pointI owned a couple of Quashqais through 2010 - 2016 then switched to Toyota for hybrid drive. I went back to Nissan in December 2024 and purchased a Juke Hybrid. I'm happy with the high and safe-feeling drive of the car but a bit disenchanted with some features I find irritating. In particular the Nissan Connect Data Transmission screen which requires accept or decline every time I start up. Nobody seems to have found a way to disable this. Lots of audible warnings - though I sense most new cars have this now. Anyway, I look forward to putting a few miles on the clock this year. Happy to be here and I'll keep an eye out for useful tips.1 point1 pointHi Trevor, Thank you for your input, anything helps at this point, much appreciated! All the best, Daniel1 point1 pointHi Trevor thank you yes looks a bit tricky. Not in a rush to buy but keeping a look out 🤞1 point1 pointStill got the Juke. 5 weeks in now and coming around to about 1k of driving. Best mpg I have managed is 54, Getting about 40 around the town. Should be getting my car back on the 10th unless they hit another snag.1 point1 pointThe vanes are located inside the turbo and can be cleaned using a cleaning solution in situ https://www.ebay.co.uk/itm/292459335127?_skw=turbo+cleaner&itmmeta=01JC60BMWEXRSD20EMHAM2ZFK6&hash=item4417ef4dd7:g:wcwAAOSwvShajqeM&itmprp=enc%3AAQAJAAAA0HoV3kP08IDx%2BKZ9MfhVJKlEsMwj%2F9Rwy31LfWXY0vu7JPmLf9xI%2B%2BMMJNw2%2BBAV%2FAzGfwovr4g0y%2B3nTHJ4Prps1SHhzuT%2Ff2g2nWknOStqIPX6QYXX8mYiOwrPQZg0rCbLgkZPxW2e%2Bb%2FYuW1DwD1hTh1Pxnmpzlv3q%2Bmbox0A19ibnfkcrcj6SmcyxcJgPmsnqSNrib3vGE5upPP8XDzI8lnokXOTc44%2FUuHtUlQmJoH0yyaUgDzXcWukxhKo4OnzBu0ua0dem9Pz9hohvhw%3D|tkp%3ABlBMUKrOrsDhZA1 pointI would like to replace the head unit on my Maxima, in particular to get a functioning integrated satnav. I could do with a recommendation based on experience from a J12 owner. By way of introduction, I am in my seventies and retired as a Postman. First Nissan (Datsun), was a 120Y Coupe (my wife's) on which she traded a 72 Torana. After that, 180B wagon, 200B Wagon, N10 Pulsar (first model 5 speed manual dealer rep {my neighbor} car, Skyline Exec, 260C 280C (one of those was a wagon ?) 2002 Maxima 320k J12 2012 Maxima (written off for me) J12 2012 Maxima replacement. I also had a Bluebird as a company car, part of a small fleet I bought for the company I worked for. Main interest in motoring is BSA/Triumph bikes.1 point1 point1 pointHi - just bought my first Nissan ... a 2008 1.6 ltr Micra K12 cc Sport convertible in silver. 3 previous owners and 116k on the clock... it was a cat n insurance write off due to light damage to boot lid and rear bumper! It runs excellently, even the intelligent key works (well most of the time - lol!) ... and the roof works perfectly, so looking forward to the summer months! A few pics the 'Micra Machine' attached. Cheers Steve!
 1 point1 pointMerry Christmas all..pick up a 1990 Silvia project recently..will be looking help info as project progress..thanks all..1 point1 pointThe colour is not an issue but the type is (all coolants now are of the OATS type)1 pointI swapped the cluster this weekend. Also took the opportunity to replace the crappy OEM-radio with a Bluetooth one. Used a 1-din dashkit for that, looks quite alright actually. Nothing needs to be done to enable the replacement cluster. It’s plug and play. The mileage is stored in the cluster, so make sure you install one with slightly higher mileage than what you have as to not get into any odometer issues during the next MOT. I swapped my faulty 179k cluster with disabled check engine light for a unmolested one with 185k on it. Paid 40 bucks for it at a local junk yard. Those extra 6k in mileage won’t hurt the (non-existent) resale value anyway.1 point1 pointHi all I own a Note Acenta 1.4, no where near fast but very practical and probably one of the best cars I have ever owned1 point1 pointNissan note 2008 1.6 Petrol Having listened to my drive belt squealing like a strangled cat thought it best I changed it, car has done 140,000 on what I think was the original belt. First as it’s a 1.6 petrol it only has one belt, cheapest place was Halfords at £17. Next watched videos on how to change it, easy I thought, so set to work. Jacked up and on axle stand removed drivers side wheel then attacked the inner wing lining, lots of popper fittings and screws, lot of poppers broke on removal, made sure I had spares. Now I can see the drive belt, well cracked and shiny, slacked tensioner pulley bolt (13 mm) and removed the belt, easy. Checked out belt against new, all ok but could I get the new belt on, no way. Tried the tensioner pulley adjuster, this was a nightmare to get at as you cannot see it all touchy feelly, anyway the adjuster was rusted and not for moving, only option left was to remove the pulley. Cleaned it up and freed up adjuster, next challenge was to re fit the adjuster, which you have to do blind and you can only use one hand, after a lot of cursing I still couldn’t get the thing into position. Looked how to gain better access, remove the front grill and then get another pair of hands to hold the adjuster in place while I re fitted the pulley, easy. Put the new drive belt on and now with relatively easy access to the adjuster tensioned the belt. No more squealing, job took in total about three hours around two hours longer than needed. So before I do my wife’s car going to ensure the tensioner bolt is lubricated, was the main cause of the delay. Will also just remove the front grill and see if it can be changed without having to remove inner wheel arch liner. Hope my experience saves people time and effort.1 pointOkay, I did what I should've done before posting a question, and checked the technical manual. It seems getting the cluster out is straight forward. Remove radio, remove temperature controls, remove cluster panel and then remove the gauge cluster. Nissan calls it a "combination meter" for whatever reason. I've attached the relevant page here if someone else comes across this topic in the future. I haven't found where mileage is stored, but I'm assuming in the cluster itself. I'm gonna order one with similar mileage. If mileage turns out to be recorded somewhere else that would be a bonus, but if not a few extra thousand miles on the odometer won't hurt and won't set off any alarm bells during the next MOT.
 1 point1 pointHi thanks for your reply I'm confident the other switches are ok as the interior light now comes on which ever door I open so I assume there working.1 point1 pointHi thanks for your reply I really thought I'd cracked it I realised that the interior light wasn't coming on when the rear passenger door was open nor did it show up as open on the dashboard so I unscrewed the switch and found the wire was broken down at the bottom near the seat anywayni joined the wire back up the interior light works as it should now and it also shows up as open on the dashboard but the lights are still flashing1 point1 pointThanks for the warm welcome Trevor. it was indeed as you described, a clip down by the gear selector arm in the engine bay. i found a clip down there obstructing the movement (it fell off the air filter box). i then moved the gear linkage arm around a bit and made sure everything was connected and moving in the right way and it seemed to fix it. silly really, but sometimes, that's just how it goes hahah1 point1 point1 point1 pointHi all. Merry Christmas. Got my new Qashqai 1.5 Tekna e-power on 17/12/22. loving my new car.


 1 pointI've had a reply from Glyn Hopkin: https://video.citnow.com/vtNMwr0bg1j As I said to the salesman: "And I was supposed to know that because.....?"1 point1 pointHi Trevor, blasting didn't work so took it to the local Nissan Dealership. They identified a problem with the Ad-blue system and replaced the tank and pump on warranty. Did a great job. 👍1 point1 pointHi Trevor, thanks for this. Ended up buying the car yesterday, 2.0L Qashqai+2 Acenta. Drives real smooth, lovely and quiet, decent power, overall, very happy with it. One thing my wife has ordered is a new gear know as the other has worn - are these easy to replace? Gear knobs of old simply screwed off, but this has the lift handle for reverse, and I'm wondering how much trouble this may cause?1 point1 pointWould any one like to swap their GTR for my 350z…one lady owner, never drifted1 point1 pointI have had the car checked and there are no issues. It appears to be a fault with the app and Nissan are looking into it.1 point1 pointHi Luke.....welcome to the Club I would say you are correct that it is the antenna and as far as I am aware it would not need coding to the vehicle as it does not generate or hold the immobilise code (the ECU would have that information) it simply amplifies the signal from the immobiliser chip in the key fob1 point1 pointHi is anyone able to advise where I can get oem Gt edition side decals? Like eBay and other places online advertising 370 accessories these decals they offer just seem to be Ali express stuff and the decals do not fit,the writing is to long,I expected maybe poorer quality but not the actual writing itself to be the wrong size lol. Thanks in advance for any replies.
 1 point1 pointHi everyone, greetings from Denmark and thanks for membership. I´m here for tips and tricks, hope I can get some and give some. My car is a Micra K13 facelift
 1 point1 pointThinking of selling my 1996 Nissan QX 3ltr SEL. Any idea as to what price I should ask? Thanks Mike
 1 point1 pointAfter several years of absence it feels good to be back behind the wheel of a Nissan automobile. Thanks alot for the acceptance into the club and I look forward to many great memories !
 1 point1 point1 pointI bought a a 2006 serena and i download Google translator and now i have my mobile Bluetooth connection and my dvd work i cant seam to find a disk for the sat nav to work but just rest my mobile over the screen a@d use Google maps. love the vehicle. going touring round isle of man next year and Britain i live in hull uk1 pointThank you for that clear and concise information. Much appreciated. I will let you know how i get on.1 point1 pointWill be trying a new suction control valve, will let you know if it works1 point1 pointHi Daroosi, did you ever resolve your screeching central locking as my 2007 model has started doing the same, Mickmoonie 🤘1 point


